Having worked through creating a CDLC[1]‘Custom downloadable content’. once ‘with a lot of help from my friends’, I decided that I’d document the process for the second one (The Beatles’ ‘Come Together’, from the Abbey Road album; ) in the hopes that this might be found useful by others.
There are of course variations on the theme, and I’ll do my best to outline options as I go. That said, I make no claims regarding complete comprehensiveness!
Note also the Customs Forge tutorial on CDLC creation which gets updated from time to time; I strongly recommend reading through it first to ensure that any recent changes I may not have covered don’t fall through the cracks!
Software tools
The happy thought, first of all, is that everything can be done using free open source software, and my first attempt at CDLC creation relied upon that. That said, there are some fairly cheap software tools which make the process easier, quicker, and (depending upon one’s skill level) of a higher end-quality.
It’s also worth noting that—these days, anyway—this whole process is most easily carried out on a Windows PC since maintenance of the tools for Mac has proven at times difficult. Apple makes regular changes to its macOS which quite frequently break the software, leaving developers playing catch-up and sometimes even in a situation where patching is for all intents and purposes impracticable. Therefore, please note that where software is said to be available for Mac, this may well mean ‘for certain (typically older) versions of macOS only’, so I recommend avoiding making assumptions. For assistance with Mac, I suggest consulting the experts via the #mac-os and #creators channels on the Customs Forge Discord server. For this reason (a.o.), the walkthrough described here details a Windows workflow.
Here’s the list of software (free downloads/part of operating system unless annotated otherwise):
- Windows Media Player (or similar; ) to rip the audio file from CD[2]Ripping from CD offers the highest-quality digital starting point, though audio files can of course be sourced in other ways.
- Audacity (free download; Linux, Mac, Windows; ) for audio file editing and conversion[3]This software is strictly optional, but produces superior results with lower risk of stability issues compared with using, say, Editor on Fire . I strongly recommend it!
- TuxGuitar (free download; Linux, Mac, Windows; ) or Guitar Pro (for purchase; Mac, Windows; ) to write or edit music scores[4]In most cases, scores—whether obtained as free downloads or from commercial publications—will require some tweaking.
- Go Play Along (for purchase; Mac, Windows; ) to synchronize audio file and score[5]This software is not strictly required, but I’ve found that it can really simplify the process since it can do so quite well algorithmically; and for the cost, I decided it wasn’t worth … Continue reading
- Editor on Fire (Linux, Mac, Windows; ), required to code the chart, and one of
- Rocksmith Custom Song Toolkit (Mac, Windows; ) or DLC Builder (Linux, Mac, Windows; )—The Toolkit was the earlier software solutions, but it is older and no longer well maintained, and running the Mac version is no longer straightforward. The Builder, on the other hand, is kept up-to-date and generally more powerful in terms of features. These are the programmes used to produce the final ‘PSARC’ files (i.e., the CDLC files interpreted by Rocksmith).
Setting up a workspace
‘Tidiness is next to godliness’, and where creation of CDLC is concerned, there’s no such thing as being too well organized!
The first thing to do is to set aside a location on disc for the work to be done. Here’s what I did:
- On my D: drive—which I use for anything which doesn’t inherently have to live on C:—I created a folder entitled ‘Rocksmith’ and a subfolder named ‘My CDLC’.
- Within ‘My CDLC’, I created a folder for the artist, i.e., ‘Beatles’—no need to be pedantic and include ‘The’!
- Within ‘Beatles’, I created a folder for the album, ‘Abbey Road’.
- Finally, within that, I created a folder ‘Come Together’.
This set-up allows me to add other artists and songs as I please without resulting in an organizational nightmare.
The digital audio file
Perhaps it goes without saying, but we’re not going anywhere without a digital copy of the song to be encoded, so let’s talk about that before we go any further.
Source file
While most any digital copy will do, we do well to remember the basic maxim of computing: ‘garbage in, garbage out’. In other words, we should start with the best copy we have available to us. By the way, according to the rules of Customs Forge , this should be a legally owned copy, for what it’s worth—and for the record, I abide by all the rules and I urge others to do likewise.
The simplest and most ideal thing, in my view, is to start with a compact disc (‘CD’) version which can be downgraded to the degree necessary.[6]Extracted streamed files, besides not being legal, are necessarily lower in quality since they are to be played in real time and are thus typically compressed. An MP3 format file (for example) works too, but keep in mind that this is a lossy compression format, meaning that to a greater or lesser extent, some information has already been discarded and cannot be recovered. Ultimately, the source file should be of higher or equal quality to the desired target quality, which was 128 kbps (‘kilobits per second’) for official DLC as released by Ubisoft.[7]Some like to use an even higher target quality, like, say, 192 kbps, but be advised that this only serves a purpose when using Rocksmith Toolkit, since DLC Builder will cap output quality at 128 … Continue reading
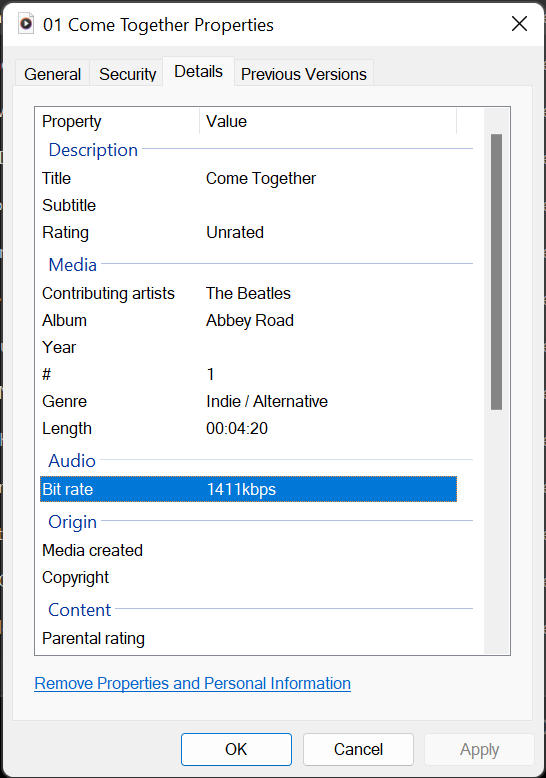
In this instance, I ripped The Beatles’ ‘Come Together’ from the Abbey Road album in CD format. CDs are encoded at 1411 kbps, much higher than needed for our purpose.
Here’s how I did it:
- I popped the CD into an external CD drive.
- I ran Windows Media Player and set the rip options to ‘WAV'[8]Later in the process, we need an ‘MP3’, an ‘OGG’, or a ‘WAV’ file, and ‘WAV’ was the only common option. Furthermore, creation of a ‘WAV’ … Continue reading and ‘best quality’ (the only choice I was given, but in any case the only choice I wanted!).
- I ripped the CD[9]I could certainly have ripped only the one song, but I anticipate doing other songs later, so decided to just do the lot. to my ‘Music’ folder.
- I then copied the file ’01 Come Together.wav’ to ‘My CDLC\Beatles\Abbey Road\Come Together’.
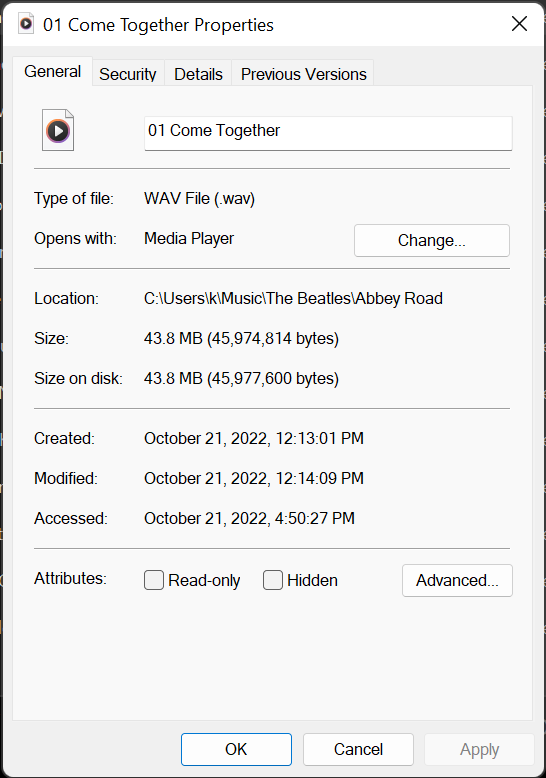
Here are the details of the file as it exists on disc:
Target file
There are two problems with such a source file:
- at 43.8 Mb, it’s far too large, and
- it’s not in the required format in any case.
So we need to convert it—and, while we’re at it, add some leading silence (more on this below).
This can be done in any number of ways—either at this point or later. But in my experience, it’s best to do it now, using a dedicated tool. I recommend Audacity , since it was designed with just this sort of processing in mind—it’s powerful, it’s free, it’s reliable, and it’s well supported. Note that when I updated it recently, I had to instal a licensed plugin (also free) from Steinberg as well. Whether this is peculiar to my set-up or more general, I can’t say, as I’ve not had to do this in the past. But it’s not a big deal, in any case.
The first step was to load the sound file into Audacity. The result looked like this:
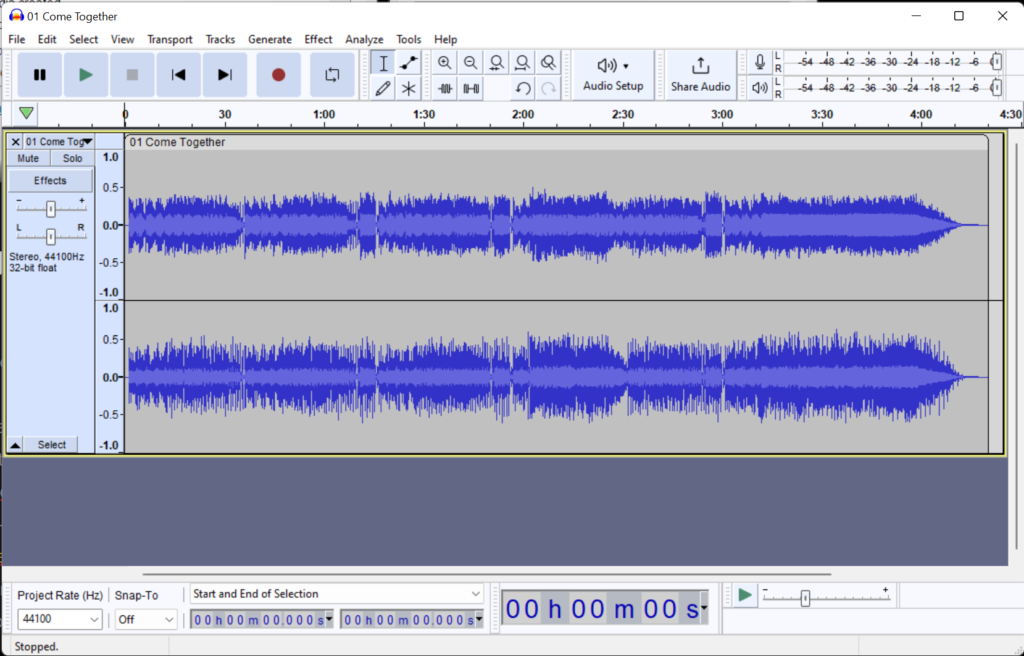
There were three tasks at this point:
- To increase the leading silence
- To convert the sound file to an appropriate format for the next step, and
- To reduce the file size by reducing the quality appropriately.
As noted, all this could have been done later, without resorting to Audacity, but this is the more stable approach.
Adding leading silence
For the final Rocksmith file to work properly, one requires approximately ten (10) seconds of silence at the beginning as per the official Customs Forge tutorial so that Rocksmith can do all its set-up and the player get ready before the sound begins to play.[10]Earlier suggestions to add only four (4) seconds as suggested elsewhere have been superceded.
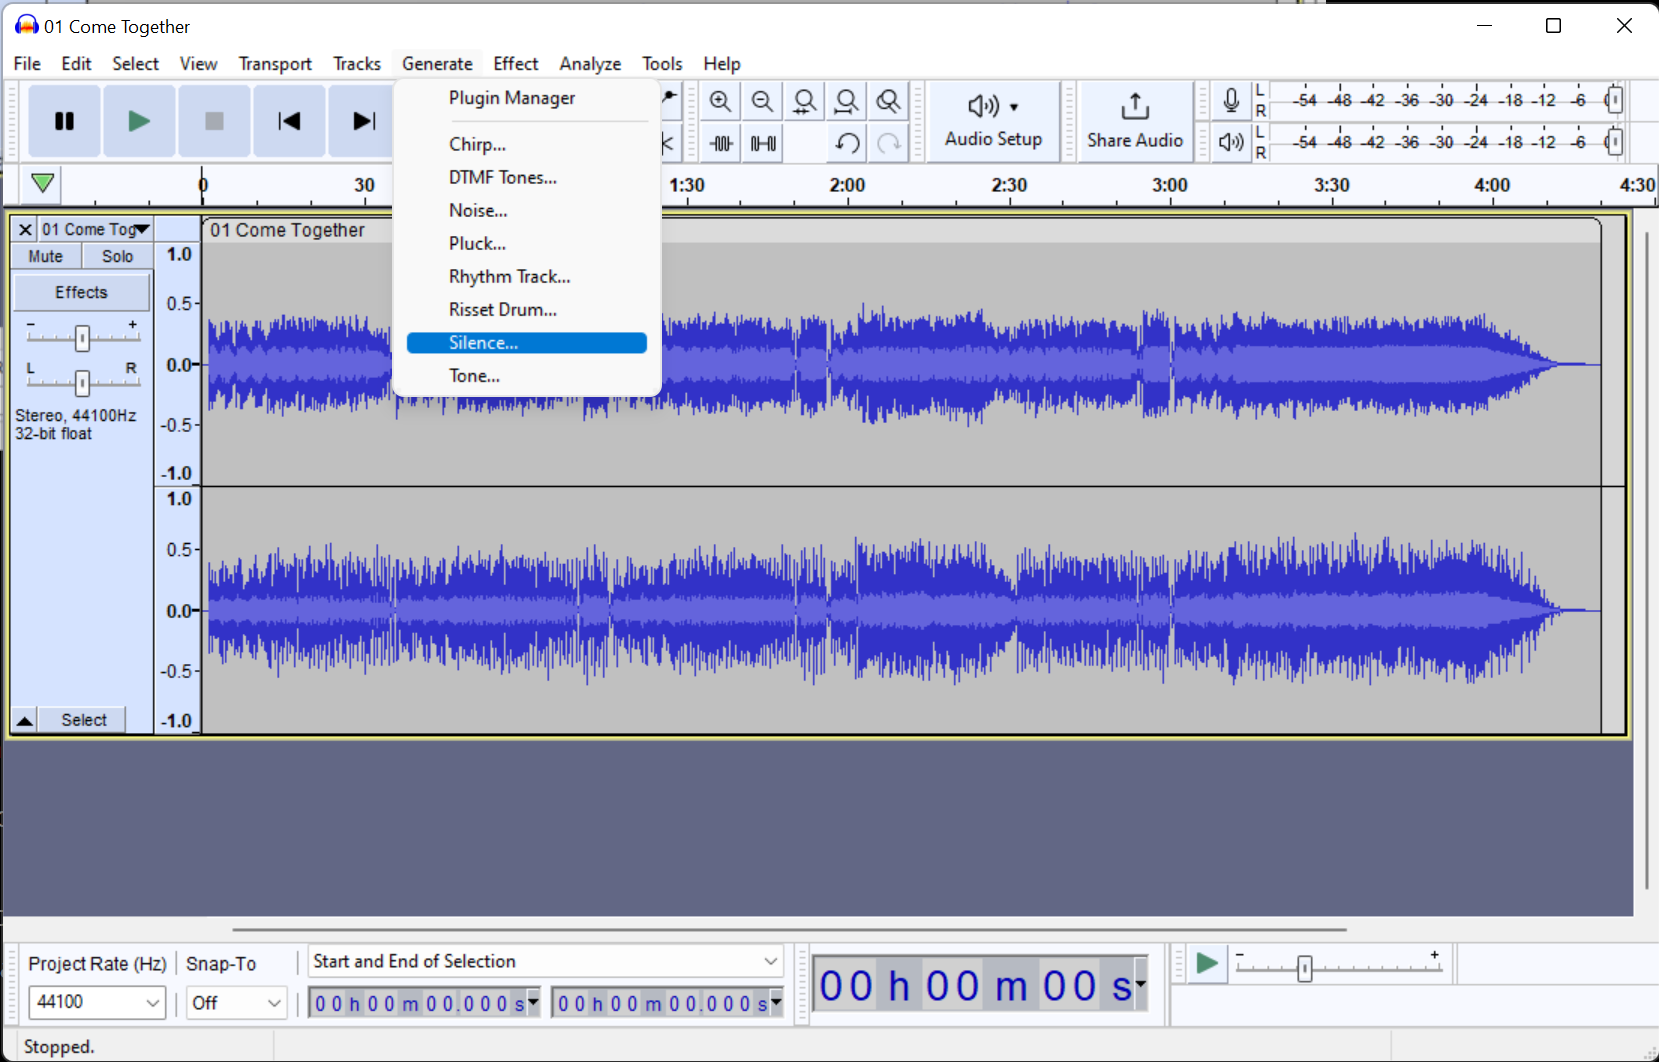
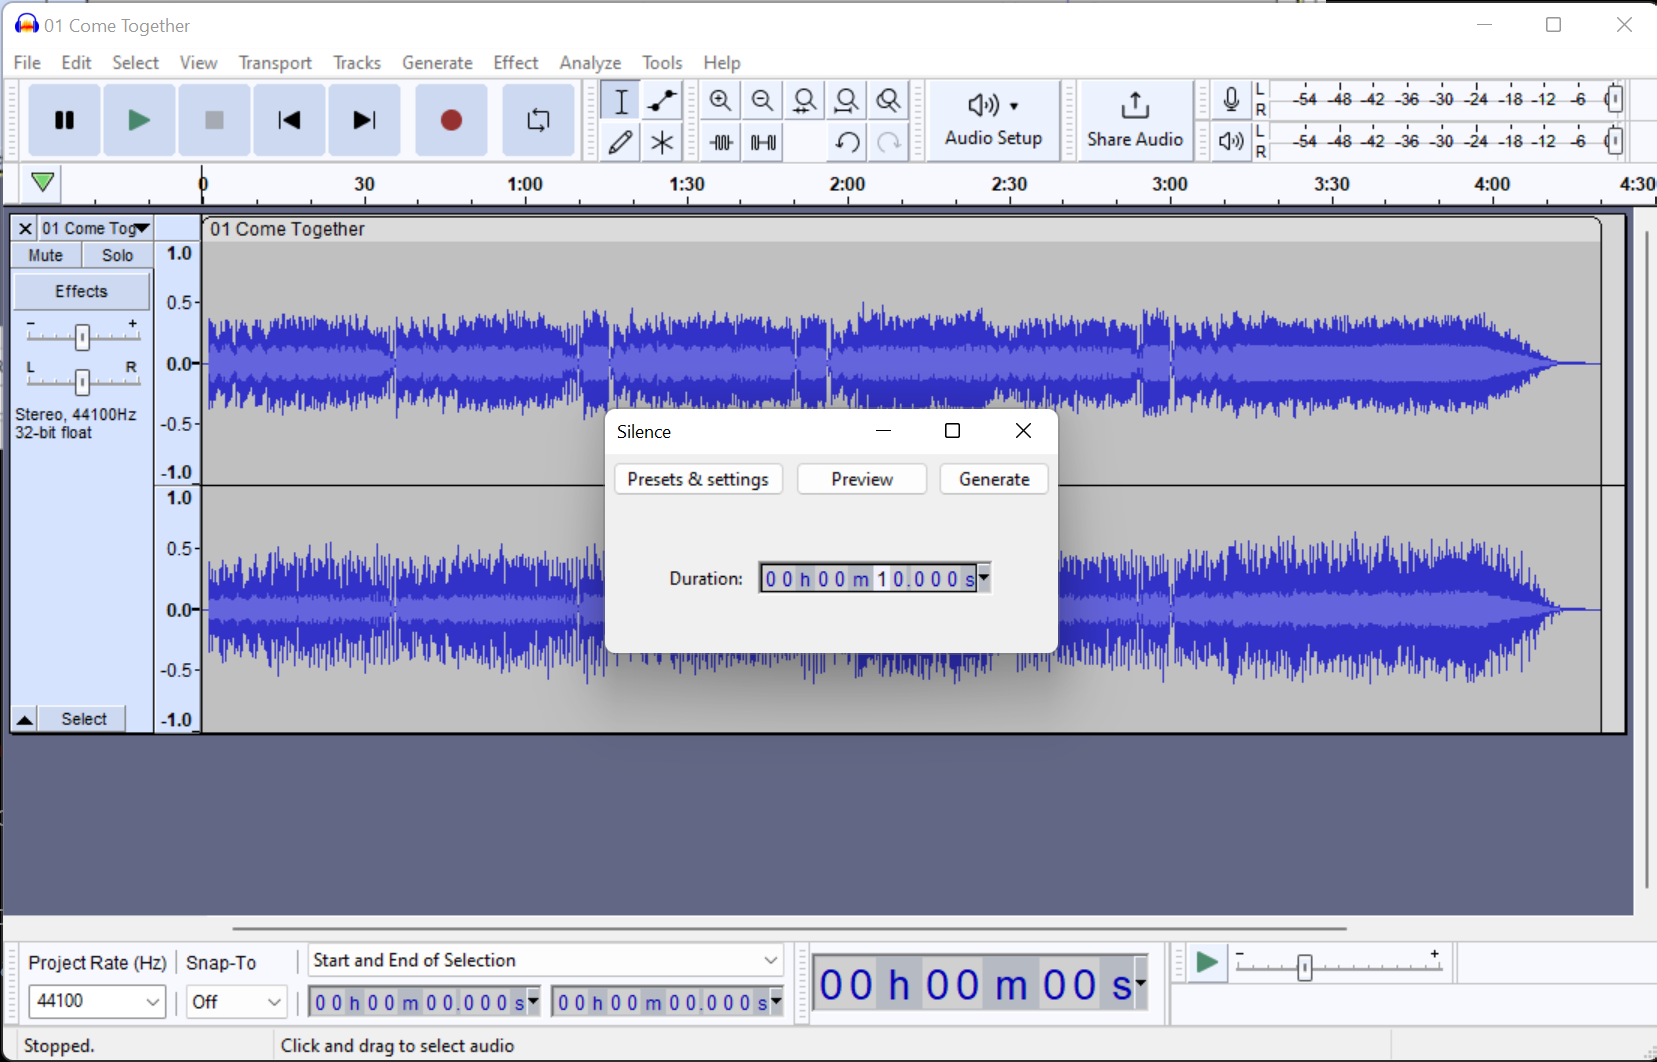
This is a pretty straightforward procedure: From the ‘Generate’ drop-down menu, choose ‘Silence’. This will bring up a dialogue box in which you can specify how much: specify ten (10) seconds, then click ‘Generate’.
Here’s the end result:
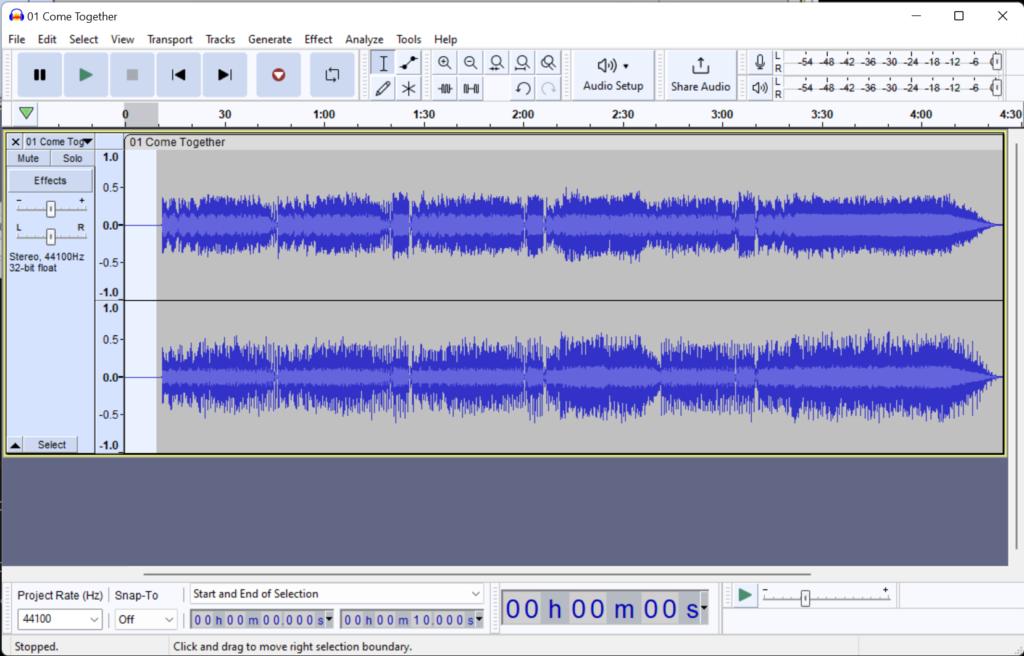
Note that since the original file evidently already had a bit of silence at the beginning (as they typically do), we now have somewhat more than ten (10) seconds. But this little bit of difference is immaterial, so no need to stress over it.
Converting and saving the file
Now, all we have to do is export the file with the desired encoding quality and format.
As for quality, the ODLC put out by Ubisoft were coded to 128 kbps; basically, the higher the number, the better the quality.[11]Note that taking an audio file at some given quality and then ‘upgrading’ it to a higher quality won’t in fact do anything except make the file bigger! Information which has once … Continue reading Some feel that an even higher quality, such as 192 kbps, would be preferable, and that is certainly an option, but only using the Rocksmith Toolkit . While this older software will allow this, it is in other respects less user-friendly. DLC Builder , on the other hand, will drop the quality to 128 kbps if it’s higher. As I prefer to use the newer (and still maintained) software, I targeted 128.[12]‘Targeted’ is a reference to the fact that it’s actually not quite that simple, as will be seen shortly!
With regards to format, Editor on Fire (to be used in due course; ) will read ‘WAV’, ‘MP3’, and ‘OGG’, but will convert formats other than ‘OGG’ to ‘OGG’ whereas ‘OGG’ files are read in directly without any further changes.[13]Communication by @firekorn on the Customs Forge Discord server’s #creators channel, 22 October 2022. Clearly, then, the sensible thing was to aim for an ‘OGG’ file at 128 kbps.
Now, there’s a little hitch, here, because the encoding options depend upon the format chosen, and for ‘OGG’, it’s not bitrate but rather a ‘quality’ number from minus one (-1) through ten (10), the default being five (5). The Audacity manual tells us that quality setting five (5) ‘typically produces a file of about the same size as Audacity’s default 128 kbps MP3 encoding, but of higher quality’ and the makers of the format tell us that five (5) is a typical choice which corresponds to roughly 160 in terms of quality . Since there can be small variations when converting, upping the quality just a little will ensure that we get the result we want. Five (5) it is.
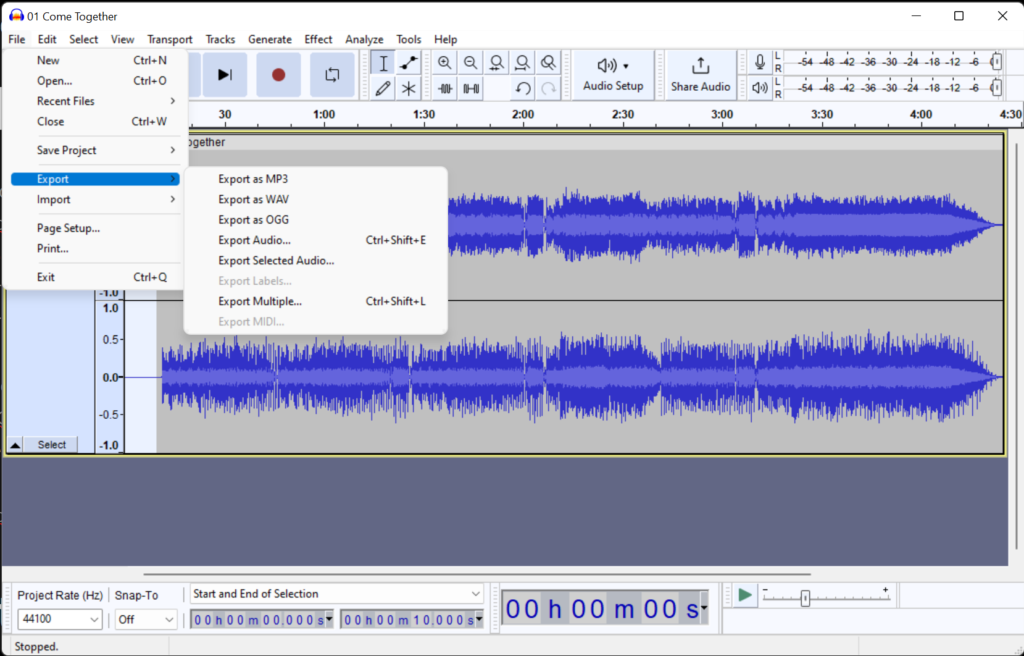
First, select ‘Export’ from the ‘File’ drop-down menu.[14]‘Save’ saves the Audacity project so that it can be loaded in again at a later date, either to continue making changes or else to undo them. This is not what we want here. As you can see, ‘OGG’ is one of the choices:
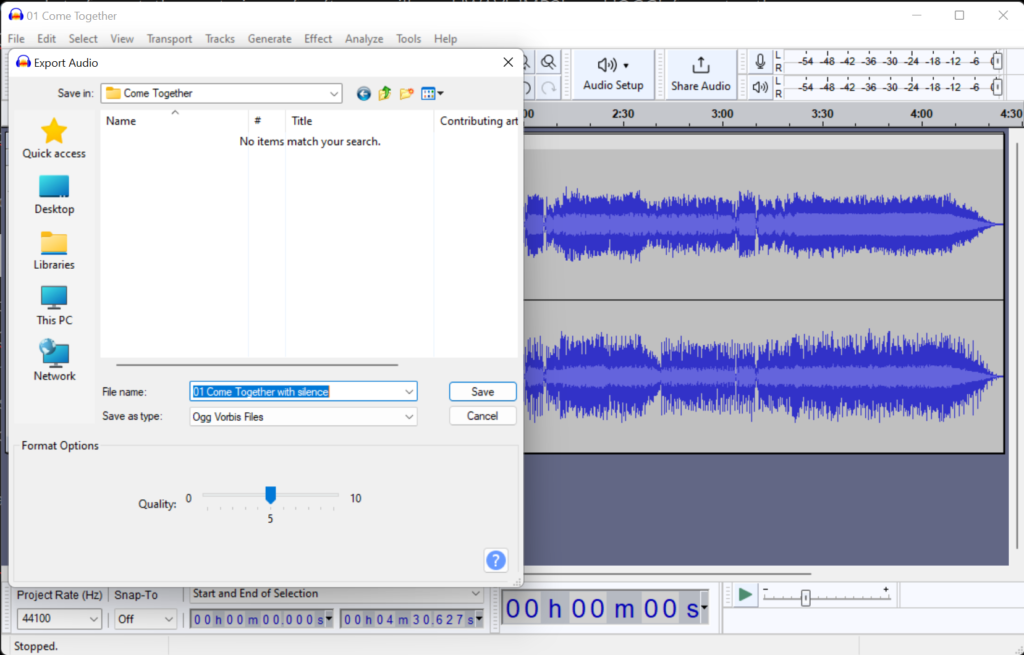
Choose that, and in the dialogue box which opens up, navigate to the destination folder, offer a suitable name to indicate the change, check that the quality is set to five (5), and press ‘Save’.
At this point, Audacity offers a metadata entry form, typically pre-populated if the sound file was ripped from CD. Check the information and make any changes you wish. Do it carefully as this information will be carried through the process and you might as well do it right the first time, even though you can update it in the next step if necessary.

Well, the first four items are correct, but the year (1969) was missing and I don’t know that I’d describe The Beatles as ‘Indie/Alternative’ ….
The drop-down menu against ‘Genre’ offers all kinds of choices; pick the one which seems best to you. In this instance, ‘Pop’, ‘Rock’, and ‘Rock & Roll’ were all reasonable choices. Wikipedia suggested ‘Rock’ so I went with that.
Hit ‘Ok’ and watch the file being generated 🙂
Here are the new specs:


As you can see, the file has shrunk from 43.8 mb to 4.38, which lies within the typical range for ODLC (4–8 mb).
Obtain a reliable score of the song
The next thing required is a solid score of the song. In this context, ‘solid’ means a score which is faithful to the song as played. There are various ways to obtain one of these, depending upon one’s skill level:
- Composing the score oneself, from scratch—given sufficient expertise and time, this may be an option, though in most cases, it ends up being more work than necessary!
- Obtaining a theoretically correct score and touching it up where necessary—’theoretically correct’ refers to various official publications (i.e., sheet music collections, and so on), which are created by skilled persons; I say ‘theoretically’ because even skilled persons make mistakes which one will want to correct, and, it is entirely possible that some level of error has been introduced to avoid copyright concerns and the like. This is in most cases probably the best bet, though there is likely a cost attached to acquiring the publications in question.
- Obtain a score of some unknown quality and correct it as necessary. In many cases, this may well be the reality. Where possible, I’d suggest comparing sufficiently many distinct scores in this category as necessary to get a sense of the nature and importance of variations. Keep in mind that with guitar, notes may be right while at the same time not played in the same position as they were in the actual song, which will result in tonal differences one may or may not be concerned about. Potential sources for such scores are, a.o.,
- Ultimate Guitar
- Songsterr
- publications from, e.g., Hal Leonard Online , etc.
While on this subject, it may be worthwhile to point out that electronic format scores, if they are in the right format, have the virtue that they generally can be read in to software directly without the painful step of entering all the information by hand, with all the drudgery and potential introduction of errors which this implies.
In the current instance, I obtained a high quality electronic version of the score in the right format (.gp5, as it happens), which I corrected in light of an official publication .[15]And, not surprisingly, there were a few small errors in the publication which I had to deal with. Keep your eyes open!!
Synchronizing score and audio
As noted above, one has to make allowance for the fact that there will be adjustments to be made to a score, first of all. Then, once all of that has been taken care of, one will want to synchronize score (by its very nature a kind of artificial description of the music) with the actual audio. ‘Synchronize’ in this context means
- ensuring that notes and finger-positions are correct, and
- adjusting the beats-per-minute here and there as necessary such that the notes in the score would be played at the precise time they in fact were played in the audio, since human beings, not being computers, tend to speed up or slow down as they play to a greater or lesser degree, quite apart from intended tempo changes (which are in any event difficult to describe accurately in something as abstract as a musical score).
Depending upon one’s choices, one or more pieces of software will be required to achieve these goals.
About score-editing software
There are probably all kinds of software solutions out there, but I’ll make a few comments about some of the more common.
TuxGuitar
TuxGuitar is good open-source (meaning, free!) software aimed at the guitar playing community. It is quite robust and certainly adequate for most purposes. It can read scores in Guitar Pro , PowerTab , and TablEdit formats, at which point they can be edited as required. Of course, complete scores can be written by hand as well.
I have used this product myself (I support open-source ventures where possible) and have been quite happy with the results. The free download is obviously an attractive feature; but be advised that TuxGuitar will not help synchronize timings as per the second bullet-point above. Using TuxGuitar does mean using another tool (whether open-source or commercial) at a later stage. This means either doing it the hard way, by trial and error in Editor on Fire or with the help of an AI algorithm such as that provided by Go Play Along . I’ll come back to this below.
Guitar Pro
Guitar Pro is a commercial but inexpensive alternative to TuxGuitar .[16]At the time of writing, we’re talking about USD 69.95 for a full version and 34.95 for an upgrade. Being a commercial product, it does tend to see improvements rather more often that TuxGuitar, and is somewhat more full-featured.
Perhaps more importantly, Guitar Pro is now (as of version 8) able to import an audio file is able to synchronize the timings between scores and audio files, which means that it can cover both synchronization needs without having to resort to other software, a definite bonus!! Between the other features and this, I’ve just (as of this CDLC project) made the leap from TuxGuitar to Guitar Pro. Sure, it cost me a few pennies, and I was able to get by before, but for me, time is tight and the reduction in drudgery was well worth it. Recommended!!
Adjusting the score—general procedure
Both software products discussed above allow scores to be edited either in the traditional fashion, but adding or changing notes on a staff, or, and in most cases more conveniently for guitarists, by use of tablature (WIKI). The latter has the advantage that one specifies the exact manner in which notes are played and inherits the notes on the staff from there. It may be worth noting also that both software solutions are suitable for the inclusion of other musical instruments, though guitar is obviously our main focus here.
Whichever software is chosen, the procedure remains essentially the same:
- play a section of audio
- play the corresponding portion of the score (the software can do this very nicely, in both cases)
- correct any discrepancies between the two, and
- repeat the above iteratively as necessary until the score and tablature faithfully represent the sounds heard in the audio.
This obviously requires a certain skill at comparing tones and frequencies and some basic knowledge of musical notation, and there’s simply no way around that; we are, after all, composing music, it’s just that we’re using modern methods to do it. Let me just say that the better the initial score (see above), the less of a burden this is going to be, and potentially the less skill required.
Synchronizing the tempo
This is the first practical (as opposed to essentially theoretical) step, and it can be done in several ways:
- using Guitar Pro (DETAILS)—I’ve already mentioned this above. Basically, what’s involved here is to slide the deltas you see above the audio waveform to the left or right so as to line up the theoretical beats in the score with the actual beats. Depending upon the song, this is most easily done by matching drum beats or the bass line (sure, it can be done via lead or rhythm scores as well, but these are typically more complex and this can therefore be more difficult to do).
- using Go Play Along —the main claim to fame here is the ability to synchronize tablature with an audio file for the purpose of playing along. The difference between the tempo synchronization here and that of Guitar Pro (DETAILS) is that Guitar Pro involves visual inspection and trial-and-error playback (which may work well or less well depending upon the song) while Go Play Along essentially scans the music and attempts to produce a visual chart of notes which can be manually or auto-matched to the score. I found this tool to be quite useful for my previous CDLC (‘Lucy in the Sky with Diamonds’) as I was having trouble doing it manually in Editor on Fire as described in the next option.
- using Editor on Fire —this (free) open-source software enters the CDLC production at the next step, regardless, so if budget is the driving factor, one can synchronize the score to the tempo at that point as well. The downside is that Editor on Fire is general-purpose rather than designed specifically for this, meaning that although it can be done, it can be a bit finicky. For example, with my ‘Lucy in the Sky’ project, I first did tempo sychronization there, but no matter how I tried, I wasn’t satisfied with the result.[17]Presumably, more experience would make this less painful down the road … but I wanted to reduce the pain then and there! Consequently, I bought Go Play Along to help, and the result was much better. If I had to do it again, I might well just get Guitar Pro instead, but at that time (not very long ago, mind you), Guitar Pro didn’t have an audio import feature let alone tempo synchronization. Such is life! Time will tell whether Go Play Along gets to simply ‘rust’ on disc or whether I’ll actually use it productively. The process is a bit different fro Guitar Pro‘s, after all.
References
Notes
| ↑1 | ‘Custom downloadable content’. |
|---|---|
| ↑2 | Ripping from CD offers the highest-quality digital starting point, though audio files can of course be sourced in other ways. |
| ↑3 | This software is strictly optional, but produces superior results with lower risk of stability issues compared with using, say, Editor on Fire . I strongly recommend it! |
| ↑4 | In most cases, scores—whether obtained as free downloads or from commercial publications—will require some tweaking. |
| ↑5 | This software is not strictly required, but I’ve found that it can really simplify the process since it can do so quite well algorithmically; and for the cost, I decided it wasn’t worth the aggravation to do it all by hand using Editor on Fire , though I did it that way the first time around, so be my guest …. |
| ↑6 | Extracted streamed files, besides not being legal, are necessarily lower in quality since they are to be played in real time and are thus typically compressed. |
| ↑7 | Some like to use an even higher target quality, like, say, 192 kbps, but be advised that this only serves a purpose when using Rocksmith Toolkit, since DLC Builder will cap output quality at 128 anyway. |
| ↑8 | Later in the process, we need an ‘MP3’, an ‘OGG’, or a ‘WAV’ file, and ‘WAV’ was the only common option. Furthermore, creation of a ‘WAV’ file is lossless, unlike the other two options, so was the preferred choice at this point. |
| ↑9 | I could certainly have ripped only the one song, but I anticipate doing other songs later, so decided to just do the lot. |
| ↑10 | Earlier suggestions to add only four (4) seconds as suggested elsewhere have been superceded. |
| ↑11 | Note that taking an audio file at some given quality and then ‘upgrading’ it to a higher quality won’t in fact do anything except make the file bigger! Information which has once been discarded cannot be recovered. |
| ↑12 | ‘Targeted’ is a reference to the fact that it’s actually not quite that simple, as will be seen shortly! |
| ↑13 | Communication by @firekorn on the Customs Forge Discord server’s #creators channel, 22 October 2022. |
| ↑14 | ‘Save’ saves the Audacity project so that it can be loaded in again at a later date, either to continue making changes or else to undo them. This is not what we want here. |
| ↑15 | And, not surprisingly, there were a few small errors in the publication which I had to deal with. Keep your eyes open!! |
| ↑16 | At the time of writing, we’re talking about USD 69.95 for a full version and 34.95 for an upgrade. |
| ↑17 | Presumably, more experience would make this less painful down the road … but I wanted to reduce the pain then and there! |
